I bought this dress at a H&M sale for a steal of a deal ($7!!). I bought it in a large size, about 5 sizes larger than i normally wear so that i would have extra fabric to work with.
It started out as a tank top dress. (I didn't get a pic a the beginning but this what after it was taken in)
First I took the sides in to fit me.
Then I used the extra fabric from the sides to make some bell sleeves.
This dress probably belongs on that 70's show but I still like it's vibes.
I made a huge classic mistake on this dress and accidentally cut the fabric on the waist while meaning to trim somewhere else. My mom helped me mend it by putting some extra fabric beneath and using a fabric glue spray. I had to sewing it a little for extra strength. I doesn't look great but at lease the busy fabric hides it well.
*The fabric glue spray was from Joann's and it's super useful
Sunday, November 12, 2017
Monday, October 9, 2017
JUMPER BUMPER
On one of my DI scavenger hunts I found this jumper! It definitely reminded me of an old sweet elementary teacher. But I thought I saw some potential since overalls are in why not a overall dress? I'll let you be the judge.
first step: cut shorter so there not so much fabric to deal with
Take in the back seam
Take in the sides to fit better
Sew back the buttons on the side for added texture and interest
Hem the bottom.. and wah laaaa My very own jumper
This was super simple but it made a big difference, anyone could make these small changes!
Wednesday, September 20, 2017
IM BIAS
I made a mens button up shirt from scratch!!! This is probably the hardest sewing project I've ever done. It may or may not have made a me cry... I did it in my sewing class at BYU last year. I loved that class because I learned so much but it is definitely not a "just for fun" class, its a class that takes time and effort.
This shirt we just used a pattern and I had to fit it to Tyler. That was hard measuring him and calculating it to his size but a good skill to learn. The shirt has a pocket, plackets, a collar, lots of buttons and buttonholes (I do not like making button holes.)
I had a hard time finding fabric I liked and ended up finding this one at walmart of all places!! I really like it. It was good to work with but it was a bit thin.
It was a frustrated with this a lot but I ended up liking it when it was finished! And Tyler is good to say he likes it and even wear it in public ;)
I might be biased but he looks pretty good! Like the bias of fabric.. but also he's my husband so I'm biased for his looks.. get it.... sorry not sorry for the bad pun
This shirt we just used a pattern and I had to fit it to Tyler. That was hard measuring him and calculating it to his size but a good skill to learn. The shirt has a pocket, plackets, a collar, lots of buttons and buttonholes (I do not like making button holes.)
I had a hard time finding fabric I liked and ended up finding this one at walmart of all places!! I really like it. It was good to work with but it was a bit thin.
It was a frustrated with this a lot but I ended up liking it when it was finished! And Tyler is good to say he likes it and even wear it in public ;)
Monday, October 5, 2015
QUILTING QUEEN
This is another post admiring someone else's creations: my Moms! I love quilts. I grew up with a lot of them, my parents have so many that people have made them for their wedding, or when they had kids or just gifts. They are awesome because they are big, they have fun patterns, they are cozy, and they make great beach and picnic blankets! I feel like quilting is growing less popular it makes me sad.. But not for my Mom, she is the Quilting Queen! has been collecting our old jeans for at least 10 years because each time one of my siblings have gotten married she makes them a denim quilt! The couple gets to pick out the fabric for the other side and they really are a treasure. My Mom has made four for my siblings and I as well as for some of our family friends! She's awesome.
I recently got married so it was finally my turn to get one! My mom has made a lot of these but that doesn't mean it doesn't take her a super long time. She puts in a lot of work and does it all by herself thats what makes it so special.
This is our blanket!
Seriously how cute is that?
This is the fabric I chose for the bottom and I love how it turned out!
These are a few of my pockets from my old favorite jeans. It adds such a fun personal touch.
Ty didn't have any old jeans to contribute.. He cleans out his closet weird right? ;) I'm so bad at getting rid of old clothes haha
Gotta love the big white stitching haha
Ty took me out on a picnic for my Birthday last week and we got to use it :)
We love it. Thanks Mom!!!!
Monday, August 31, 2015
AWL DRESS IN WHITE
Right about the time I stopped posting on this blog I fell in love with a handsome fellow named Tyler. (Hence why I didn't have time to sew or post much). We got married in the beautiful LDS Salt Lake City Temple on June 5th of this year and it was the best day of my life!
In the process of getting ready to be married in the temple and to receive my temple endowments I have made commitments to myself and promises to my Heavenly Father to dress modestly. This makes me excited to get back to sewing so that I can dress modestly and still feel cute in my clothes!
Buuut this post is not about something I made, its actually about the sewing of my wedding dress. --Shocker all I talk about is wedding stuff but all you girls with post bride syndrome understand right? ;) Anyway I was lucky enough to get seriously the dress of my dreams! I had to have a seamstress work on it to make it work with my modesty standards. Most girls I know have to do this so this post could be boring for many but since I love sewing I found the process so interesting and I was so impressed and fascinated by her work.
- fun fact: An Awl is a sewing tool -
I tried this dress on in a bridal shop and fell in love. The lace was perfect I loved how it fit me, the different layers of intricate lace, and the whole design of it... And the train? loved it. Alas it was a spaghetti strap dress which did not work for my standards, I needed to have it be a dress with cap sleeves. This is a common thing that happens in Utah with all of the LDS (Mormon) brides so the bridal assistant helping me assured me that their seamstresses were amazing and would make it just how I wanted it.
But my parents and I had doubts especially because wedding dresses are expensive and to have someone sew it could be risky. Also it may not turn out the way I want it or it could just be ugly haha. But of course I couldn't get it out of my mind and I had to take a chance on it, I also knew it would turn out great!
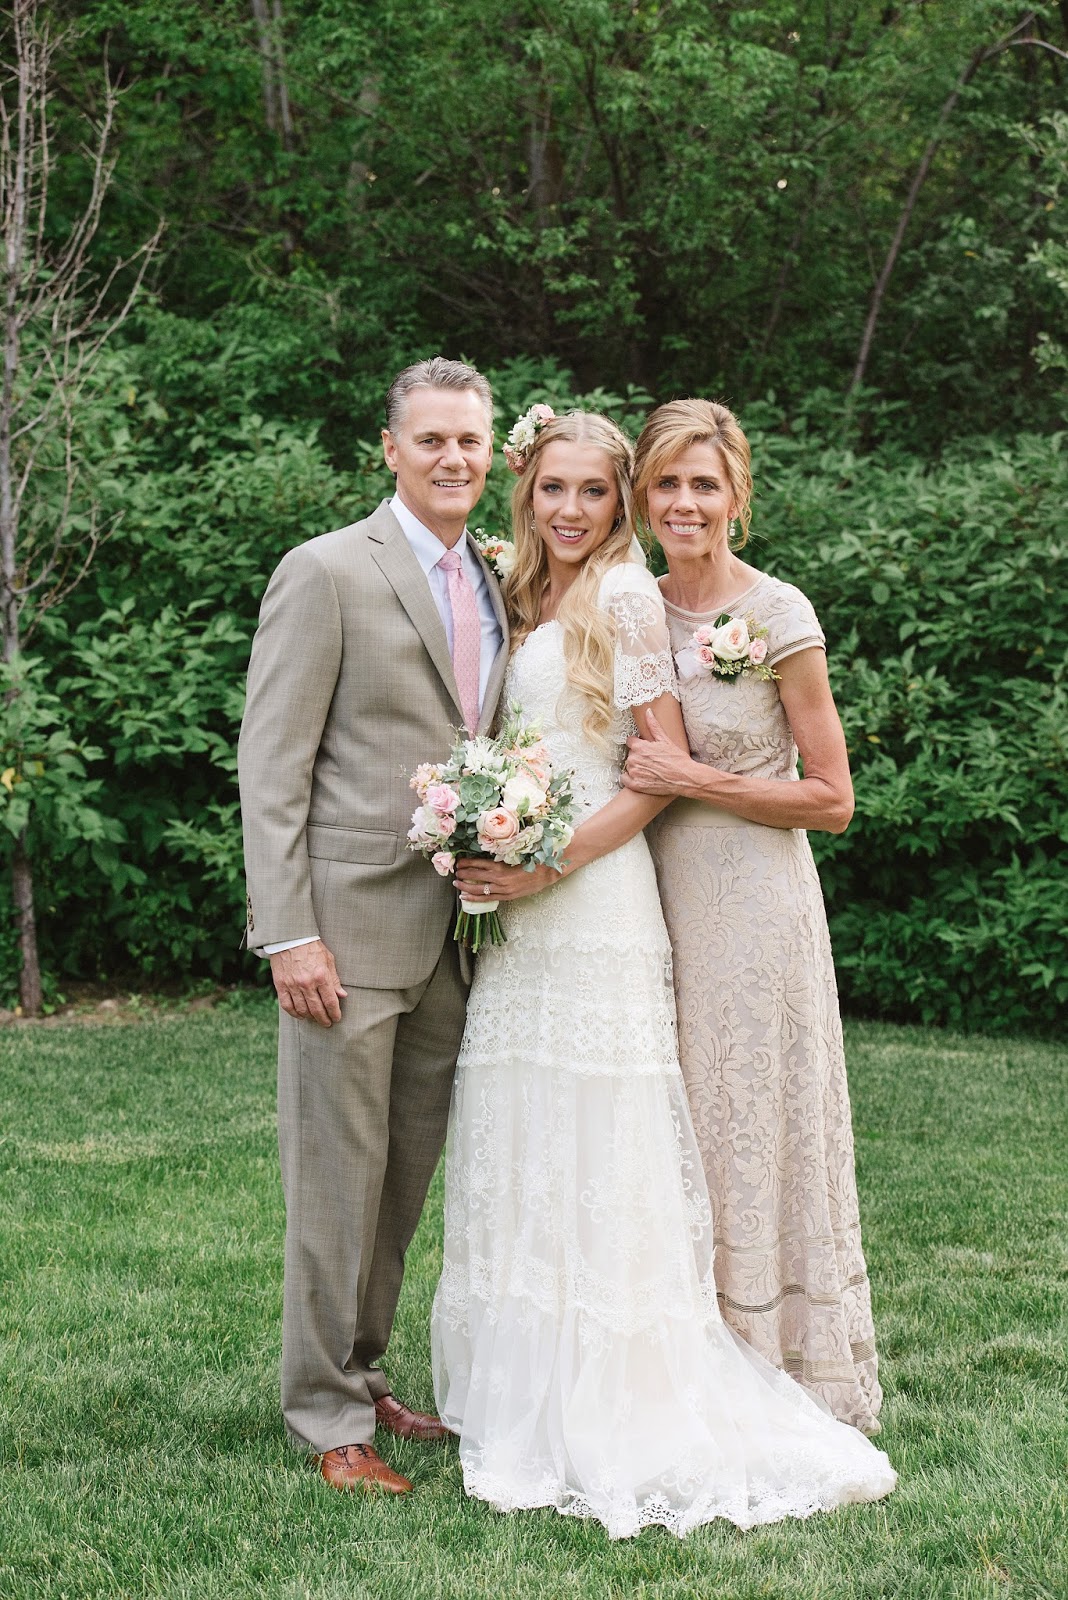
I chose to do my dress with cap sleeves then a bell sleeve made out of just lace so it was a little see through to see the lace detail. I also chose to do a sweetheart shaped neckline in the front with a V neckline in the back.
The seamstress went about this in a very interesting way. To make the transition from a dress without sleeves to cap sleeves look natural she took the dress apart at the seem under the bust and rebuilt the entire top half from my chest up. I had to go in for a lot of fittings. This is how it went..
Boning- First things first when she took it apart she took the boning out of the sides cause it was gaping out at my hips and I didn't like it so that rocked.
Applique- Then one of my favorite details on my dress was the twirly applique on the front tummy of the dress. But it reached up the bust seam so my seamstress, Mary, pealed that down to start then at the very end she re applied it just like new!
Pattern making- Next Mary made a mock up or a practice version of the top out of cheap thin fabric to make sure it fit me just how I wanted it and hit me at all the right places to make sure it was modest. This was basically her pattern for the real thing.
With my wedding dress we ordered extra fabric to make this build up possible. But it sure didn't come with much extra and it came with a lot of different laces because thats what my dress was made of. So we got to be creative but Mary had to be very careful and useful with each piece of fabric.
Lace on the Chest- After she made the top with the white under fabric I was time to talk lace. We decided it would be cool to do the lace in the chest area with the heavy lace and filled in in each spot like the chest area was before the remodel. She hand piece very small pieces of lace to make a mirror image on the chest. She said it took her at lease 5 hours just to place the pieces on the dress on a mannequin!!
Neckline- The neckline she was able to line with a lace trim that came with the extra fabric and it worked perfect I loved the texture and the small scallops coming off the neck. Pictures don't do the details of this dress justice.
Building the Back- The back we decided we could leave a little more empty space and just put the white under fabric and the netting so it would blend in. Them she cut out just a few flower shapes from the extra lace to blend it in. I was seriously amazing the way she made the back like it was made that way and added a zipper because the original dress had a very low back.
Bell Sleeves- The last step was the sleeves! Ive wanted bell sleeves on my wedding dress for a long time and the moment I saw this dress I thought they would be perfect with this style. I loveddd the lace my sleeves were made of it was the exact same as the bottom trim of my dress and I thought it tied it all together perfectly!
Mary did an amazing job with my dress and it made me appreciate the complexity and art of sewing so much more.
Also big huge thank you to my beautiful parents for giving me this gorgeous dress and doing so much for me to have my dream wedding. Im the luckiest!!
And now I get to show off my dress a little more.. because as you post brides out there can relate, you gotta post wedding pics any chance you get am I right? ;)
Isn't he handsome?!
I love these two pictures facing each other :)
I loved having my cute flower girls carry my train everywhere for me!
Love you forever Ty :) Best. Day. Ever.
Dress - Alta Moda Bridal
Dress Designer - Yolan Cris
Photographer - Mikki Platt
If you care enough to read this whole post then you might like my dress enough to know this.. I am very sentimental and want to keep my dress for keepsake and for my future family so I will never resell it. But I am considering renting it out just once to earn a little money back from it. I will not allow any alterations so you must be about my size- Im 5'10" and I wore heels so it's pretty long. Let me know if you are interested. thx oxxoox
Monday, March 24, 2014
TIE THE SEASON
This past Christmas I decided to make homemade gifts for my family. I wanted to give gifts to my parents and my siblings draw names and I got Tiff and Alex. So I chose to make Tiff and my mom skirts and Alex and my dad neck ties for church. So Tis the season, or Tie the season I don't know you tell me... Haha sorry I had to throw a dad joke in there since Corey G. is apart of this post.
I'm sure there's a simpler way to make ties but I just got a tie and copied it and kind of made up my own way to make these!
I started with Alex's and the first one took me awhile to figure out but the next one was easier. It was hard for me to find silky fabric the was masculine and not so feminine so they ended up with pretty bright ties. But next time I want to try cotton fabrics I bet there would be more boy options.
Basically to make them I had one long piece of fabric and two smaller pieces for the ends. I placed them on top of each other on the ends with the front side inward and sewed the angle on the bottom of the it. Then I turned it inside out and it was a triangle shape with a seam at the bottom. Then folded the side edges under twice and hot glued them down. Its really simple as long as you measure it to a real tie correctly!
It was definitely a first experiment and I learned a lot for next time about improvements that can be made, but I was pretty happy with the outcome!
Look at these handsome guys! They are always such good sports to wear my gifts :)
Wednesday, December 4, 2013
SEAMS SIMPLE
This project may "seam" simple... Well that's because it is! Haha sometimes these are the only kinds of projects people have time for.
Sooo I found a dress on sale at H&M... emerald green, sweater material, long and cozy!
But then I tried it on I realized it was completely see through.. yikes
But then on the next rack I found a little green dress on sale too... light bulb! haha
I bought both dresses, they were on sale plus I had a 25% card so that was awesome. Then I altered the green dress to fit tighter because I bought an XL so it would be longer. Then cut and sewed the sleeves to a tank top to match the should seem of the sweater dress. And cut and sewed the back lower because the sweater dress has a lower back.
So the green dress in now a slip underneath. It was simple easy and quick but thats the kind of project that is possible to do on a more daily basis. I love my new green cozy dress!
Annnd I found out that it also doubles as a great pilgrim dress...
My friends had a Frenzgiving party with costumes and a thanksgiving feast!
I hope your thanksgiving was as good as mine :)
Subscribe to:
Posts (Atom)